Showing posts with label Tutorials. Show all posts

Sunday, December 18, 2011

DIY Weekend - Monogram Wreath
Your "Not-So-Typical" Holiday Wreath Tutorial

Confession: The Gals are not really feeling the holiday spirit this year.

Typically by this time in December trees are up, ornaments and stockings hung, and both of our houses have festive holiday nick knacks scattered about (buying for your own store has its downfalls at times..."Must order this, it would look fantastic on my mantle!").

None of the above mentioned items are out at either of our humble abodes.

Over lunch on Friday we were trying to figure out what is different this year from than the rest...

Could it be that we were staging holiday merchandise and decorating a tree in October?

Could it be that my car read this temperature on my way home from work on Friday?


Or could it just be that while pumping gas this week they had non-stop Christmas music on...at the pump? Really BP, was that necessary?

Whatever it is, I decided I would try to get out of my "Bah Humbug Holiday Rut" this weekend. What better way to do that than get my craft on!

One word. Pintrest. If you don't know what it is...you MUST click on the link. If you do know what it is...you'll understand that this website may kick start an addiction. A while ago I "pinned" a wreath that screamed make me!

Two Gals Tutorial: How to Make Your "Not So Typical" Wreath...

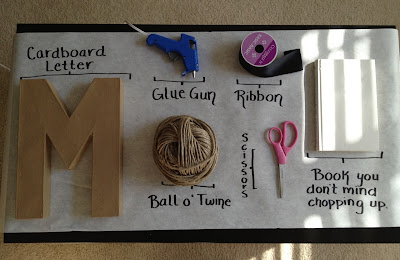
To begin, items you will need....


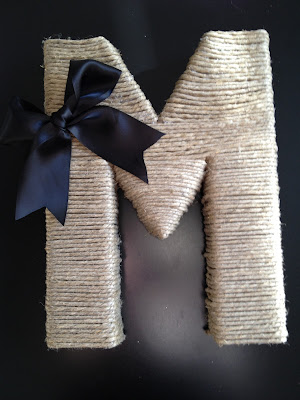
Step 1: Begin by creating a small line of glue, attach your twine at the bottom of your cardboard letter.


Step 2: With a kung fu grip, start wrapping twine around the letter. The great news--the initial line of glued twine will build your foundation, in other words...no need for further gluing until you reach your stopping point.


Step 3: Continue to wrap. Glue twine to letter until you come to a point where you will have to start on a different section. With this project, I wanted to keep the twine in straight and clean lines. Upon further dissection after I completed the project, it may have been best to just go with the flow of the letter rather than focusing on the horizontal lines.


Step 4: Addition of flair! Create a bow.


Step 4.5: Attach said bow.


Step 5: Addition of EVEN more flair, paper rosettes! Using an old book, slice 3 pages out (side note: The Gals hit up estate sales and used book sales at our local libraries all the time. Old book pages can be used for SO many things!)

With a pencil, create a spiral pattern. No need for perfection here, your pattern can be different sizes and widths. It will give each rosette a varied look.


Cut out spiral pattern. This is what your final outcome should look like...


Step 6: Taking the center of your spiral, begin twisting the old book page. Once you get started, the paper will just start to twist on it's own and you will see the rosette forming.


Step 7: With a glue gun, attach paper rosettes to letter. I wanted to make sure that each rosette was different from the other. So I adopted a "Let Go and Let God" philosophy at this point. I kept one rosette very tightly wound and with the other two released my grip and just let the paper do it's own thing.


Step 8: Using the same ribbon from the original bow--chop approximately 30 inches. Find middle section, tie a bow, and glue the "tails" to your twine wrapped letter.


Final step: Hang and enjoy!


For anyone who loves a monogram or a wreath that is different from your typical holiday door hanging...this is the perfect project. May I add, the repeated wrapping of twine was very cathartic--and it only took me about an hour and half to create!

Total cost of  "Your Not-So-Typical" Wreath: $15
Very similar wreath seen on popular purchase handmade items website: $35 + shipping

The crafting did increase my jolly meter, a bit. Still a bit torn about putting up a tree. I'm thinking of decorating this bad boy, which I saved last Christmas after a neighbor left it for an untimely death at the dumpster. Yes, I trash picked it...but look how it has flourished!


Thoughts on hanging a few small ornaments on "Polly the Poinsettia?"

Saturday, October 8, 2011

15 Ways to Tie a Scarf

Scarves, a first-class and simple accessory to spice up your wardrobe! So versatile, they can be worn in any season--summer, spring, winter, and fall.

About two months ago, The Gals decided that we would do an in store spotlight on scarves. The problem--everyone knows one or two ways to tie a scarf, so what would be the draw to bring customers in? After some serious brainstorming, we conceived a scathingly brilliant idea...we will do a tutorial on different ways to tie a scarf!

So, very late on a Saturday night, we put our heads together, did a bit of research, and came up with all the ways we knew how to tie a scarf (there were a little over 27, but we decided to condense), got out the camera, and spent a few hours tying knots.

The product line up.

Two Gals Gives You...15 Ways to Tie a Scarf...


It was like a "Scarf Apocalypse"...


The couple hours of filming yielded some pretty funny out takes (it may have been the limited playlist we were listening to). My favorite, "You're twisting where you don't need to twist."

Enjoy and happy knotting!!

Wednesday, September 21, 2011

DIY Banner Tutorial


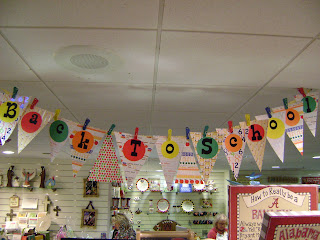
Banners and pennants--the hottest distinctive form of advertising of anything with a special significance at the current moment.

These latest fads are great tools to communicate specials, events, sales, etc. in your retail setting. Two Gal's has several mantras, one of which is: if you are given little space, use every single ounce of it! Instead of thinking horizontally, turn that thought 90 degrees and bring your customer's eye level up.

Five words...effective usage of retail space.

You can find these banners/pennants on etsy starting off at $10 and going up to a whopping $50. If you have some spare time and a creative side you can create exact replicas--for practically next to nothing.

Two Gals proudly gives you...

How To Make A Banner (For Way Less Than Someone on Etsy Will Charge You):

First things first...items that you will need:


Step 1: Download or use your favorite font from Microsoft Word. For the large banner, I used PrinterProjects.com. Print off letters.


Step 2: Using exacto knife and old magazine (no need for a cutting board with a mag), start cutting out your script.


Step 2.5: Make sure you are having an absolutely fabulous time!!

Here is what the letters will look like once you have cut them out...


(No worries if you did not pass "cutting on the line" in kindergarten...this is exactly why someone invented  Sharpies!)


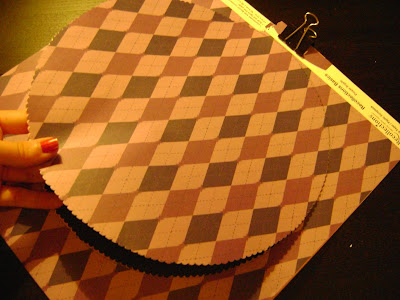
Step 3: Take some form of a round object and use a pencil to trace scrapbooking paper. A bowl works perfectly--and can be customized to the size of banner you want.


(Scrapbooking paper offers a pleasantly flaired out background--and you can usually get it on sale at your local craft store. I paid no more than $.15 per sheet for the project!)

Step 4: Using pinking sheers, cut out circular shapes.


(Two Gals Terrific Tip: When cutting out a mass amount of circles--use a paper clip to secure scrapbooking parchment along the top. This allows you to chop more at a time while maintaining consistent circles. I recommend no more than 4 sheets at a time.)

Step 5: Center letters onto paper and glue.


Step 6: Let your labor of love dry overnight.


Step 7: After the drying process has concluded; use one of the most ingenious products ever produced, a Sharpie marker, and go over any imperfections.


I also take this time to black out the PrinterProjects.com label from the bottom of the letters. Kudos to you Printer Projects, but your trademark is not the most eye appealing things on the face of the earth.

Step 8: Hit up your local craft store's $1 ribbon bin. Make small slit, about an inch in from edge of paper, and string ribbon through. Tie in a knot and make into a bow.


Front


Back


Step 9: Continue to make chain and hang in desired location!


And you're done! 

This project yielded 1 extra large banner and 2 smaller banners...


All for, drum roll please...$10.15

If you have a bit more coin to drop you can purchase pre-cut letters and create another fabulous pennant:


Maximize the look and customer appeal of your merchandise. Showcase your product or special and bring in the most dollars with any limited space!

Have you made your own banner? If so, please share--we want to see your creativity!!