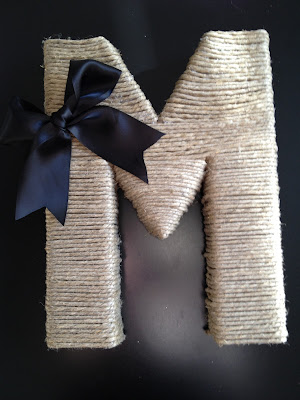
DIY Weekend - Monogram Wreath
Confession: The Gals are not really feeling the holiday spirit this year.
Typically by this time in December trees are up, ornaments and stockings hung, and both of our houses have festive holiday nick knacks scattered about (buying for your own store has its downfalls at times..."Must order this, it would look fantastic on my mantle!").
None of the above mentioned items are out at either of our humble abodes.
Over lunch on Friday we were trying to figure out what is different this year from than the rest...
Could it be that we were staging holiday merchandise and decorating a tree in October?
Could it be that my car read this temperature on my way home from work on Friday?
Or could it just be that while pumping gas this week they had non-stop Christmas music on...at the pump? Really BP, was that necessary?
Whatever it is, I decided I would try to get out of my "Bah Humbug Holiday Rut" this weekend. What better way to do that than get my craft on!
One word. Pintrest. If you don't know what it is...you MUST click on the link. If you do know what it is...you'll understand that this website may kick start an addiction. A while ago I "pinned" a wreath that screamed make me!
Two Gals Tutorial: How to Make Your "Not So Typical" Wreath...
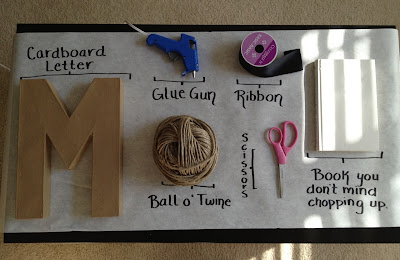
To begin, items you will need....
Step 1: Begin by creating a small line of glue, attach your twine at the bottom of your cardboard letter.
Step 2: With a kung fu grip, start wrapping twine around the letter. The great news--the initial line of glued twine will build your foundation, in other words...no need for further gluing until you reach your stopping point.
Step 3: Continue to wrap. Glue twine to letter until you come to a point where you will have to start on a different section. With this project, I wanted to keep the twine in straight and clean lines. Upon further dissection after I completed the project, it may have been best to just go with the flow of the letter rather than focusing on the horizontal lines.
Step 4: Addition of flair! Create a bow.
Step 4.5: Attach said bow.
Step 5: Addition of EVEN more flair, paper rosettes! Using an old book, slice 3 pages out (side note: The Gals hit up estate sales and used book sales at our local libraries all the time. Old book pages can be used for SO many things!)
With a pencil, create a spiral pattern. No need for perfection here, your pattern can be different sizes and widths. It will give each rosette a varied look.
Cut out spiral pattern. This is what your final outcome should look like...
Step 6: Taking the center of your spiral, begin twisting the old book page. Once you get started, the paper will just start to twist on it's own and you will see the rosette forming.
Step 7: With a glue gun, attach paper rosettes to letter. I wanted to make sure that each rosette was different from the other. So I adopted a "Let Go and Let God" philosophy at this point. I kept one rosette very tightly wound and with the other two released my grip and just let the paper do it's own thing.
Step 8: Using the same ribbon from the original bow--chop approximately 30 inches. Find middle section, tie a bow, and glue the "tails" to your twine wrapped letter.
Final step: Hang and enjoy!
For anyone who loves a monogram or a wreath that is different from your typical holiday door hanging...this is the perfect project. May I add, the repeated wrapping of twine was very cathartic--and it only took me about an hour and half to create!
Total cost of "Your Not-So-Typical" Wreath: $15
Very similar wreath seen on popular purchase handmade items website: $35 + shipping
The crafting did increase my jolly meter, a bit. Still a bit torn about putting up a tree. I'm thinking of decorating this bad boy, which I saved last Christmas after a neighbor left it for an untimely death at the dumpster. Yes, I trash picked it...but look how it has flourished!
Thoughts on hanging a few small ornaments on "Polly the Poinsettia?"


Your diy wreath is very very cool!! How bought you string some lights through the poinsetta?
ReplyDeleteI just pinned this (with a link to your blog), about 30 min ago, onto my "Crafts" board on pinterest. It has 23 re-pins at the moment. Uh, yeah- WIN.
ReplyDeleteLove the wreath! You did a great job and it looks so festive!
ReplyDelete