Friday, December 23, 2011

Car Antlers - Absurd Holiday Trend

Sending some jubilant cheer to our friends at Melissa and Doug!

First off--whoop whoop and a fist pump!! The Gals are officially out of the shop until January 3rd! I had this surreal, exuberant joy while leaving work today--it was as if I was in third grade and starting Christmas break. Stay tuned...we have some amusing activities planned for our time off!

Now on to business. Has anyone else seen a HUGE influx of reindeer antlers (red noses on the grill optional) on vehicles this year? What is going on with this epidemic? Did The Gals totally miss out on some sort of amazing retail trend?

This past week, we were out and about delivering some holiday gifts, when we spotted a car with reindeer antlers. The festive car flair (complete with small jingle bells, mind you) stuck out on this yellow car like a sore thumb.

Cue brief, snarky, sleep deprived commentary:


While pulling into a parking garage, no more than 15 minutes later, we were catapulted into a reindeer car antler breeding ground.

We were flabbergasted by the astronomical amount of antlers. Most logical thing to do...take pictures of every single holiday car trend victim.

And no joke, this is quaint 3 story parking garage...

Yuletide Nitwit #1 - Complete with stick figures.

Yuletide Nitwit #2

Yuletide Nitwit #3

Yuletide Nitwit #4 - Above mentioned Lexus from video...

Yuletide Nitwit #5

As you may be able to tell--it was just a downright nasty rainy day. Can only imagine how incredibly waterlogged those car decorations were.

Our apologies to any of our readers, but we DO NOT get it. What is the pleasure in "festing out" your car with such an inane accessory? Why would you want to outfit your car to resemble an animal?

Are we the only ones...or is this an utter festive faux pas?


Thursday, December 22, 2011

Festive Tunes - Margaret's Pick for 2011


T-Minus 2 days, 2 hours, 45 minutes.

Does anyone else feel as if it has been the holiday season for an extremely extended period of time this year?

Continuing on with our favorite festive tunes...

Madge's Pick: "Winter Song" by Sara Bareilles and Ingrid Michaelson

Why is it Madge's Pick: "I have a few reasons. 1. It's really a beautiful song. 2. I think it has a bit more to do with the 'Christmas Spirit,' rather than most of the Christmas songs out there. And 3. It doesn't directly pertain to Christmas."

Sara Bareilles and Ingrid Michaelson - Winter Song


Side Note: After watching the video, I really think the two girls in the video freakishly resemble Jenny and I...if I had brown hair.

What does Margaret really, really want for Christmas this year?


New slipper boots. Desperately.
 Homespun Gifts
"Madge's Hot Mocha Cocoa"

Every year, during the holidays, I find myself in a dilemma. What kind of gift do I give our sales associates? It seems trivial--but you are purchasing a pretty vast amount of gifts, and for individuals with varying tastes and styles.

In the past I've purchased...
  • Unique coffee mug with Starbucks gift card - atypical.
  • Gift card - boring.
  • Scarves in assorted colors - gets pricey.
  • More gift cards - whole lots of boring.
I love receiving homemade gifts and goodies! Especially in today's economy, it makes me appreciate that someone spent time creating/making a gift, rather than going out to a large retail establishment and picking up something ordinary.

This year I came across a delicious hot cocoa recipe--added my own twist, espresso (because who doesn't love anything with coffee in it?), and made lovely gifts for our sales associates!

Madge's Hot Mocha Cocoa:

In 12 oz mason jars layer ingredients in the following order:
  • 4 tablespoons of unsweetened cocoa powder.
  • 4 tablespoons of granulated sugar.
  • 2 tablespoons of espresso powder.
  • 4 tablespoons of powdered milk.
  • A pinch of salt (making sure to throw a bit over your left shoulder).
  • 2 tablespoons of chocolate chips.


I decided to add a bit of flair to my mason jars by tying small bow out of some red/white and green/white "floss" (yup the stuff you used to make friendship bracelets out of). And using an old school mailing tag, labeled each jar and on the back gave the simple instructions, "Makes two servings. Mix with hot water and enjoy!!"


A fabulous and tasty handmade gift--one that is a cinch to make and easy on the eyes, LOVE the layers!

Wednesday, December 21, 2011

Festive Tunes - Jenny's Pick for 2011


As in most retail establishments, for the past 21 days we have listened to our fair share of holiday tunes. Our playlist has been bombarded with everything from Bing Crosby's Christmas Classics to Merry Mixmas.

We decided to share the tunes that we have grown particularly fond of this year.

Jenny's pick: "I Want A Hippopotamus For Christmas"

Why is it Jenny's Pick: "I love the made up words and carefree attitude towards adopting one of nature's largest animals."


So what does Jenny really want for Christmas this year?


A new iPhone. As you can see...it has seen better days, much better days. And it is now interfering with her "mobile communicating."
3 Days, 5 Hours, 17 Minutes.

Monday, December 19, 2011

Appreciation of a Well Wrapped Gift


Simple yet classic gift wrapping. Brown kraft mailing paper. Azure blue yarn. Old school mailing tag stamped with blue snowflakes.


Classy, cost effective, and a welcome change from your typical wrapping paper.


Sunday, December 18, 2011

DIY Weekend - Monogram Wreath
Your "Not-So-Typical" Holiday Wreath Tutorial

Confession: The Gals are not really feeling the holiday spirit this year.

Typically by this time in December trees are up, ornaments and stockings hung, and both of our houses have festive holiday nick knacks scattered about (buying for your own store has its downfalls at times..."Must order this, it would look fantastic on my mantle!").

None of the above mentioned items are out at either of our humble abodes.

Over lunch on Friday we were trying to figure out what is different this year from than the rest...

Could it be that we were staging holiday merchandise and decorating a tree in October?

Could it be that my car read this temperature on my way home from work on Friday?


Or could it just be that while pumping gas this week they had non-stop Christmas music on...at the pump? Really BP, was that necessary?

Whatever it is, I decided I would try to get out of my "Bah Humbug Holiday Rut" this weekend. What better way to do that than get my craft on!

One word. Pintrest. If you don't know what it is...you MUST click on the link. If you do know what it is...you'll understand that this website may kick start an addiction. A while ago I "pinned" a wreath that screamed make me!

Two Gals Tutorial: How to Make Your "Not So Typical" Wreath...

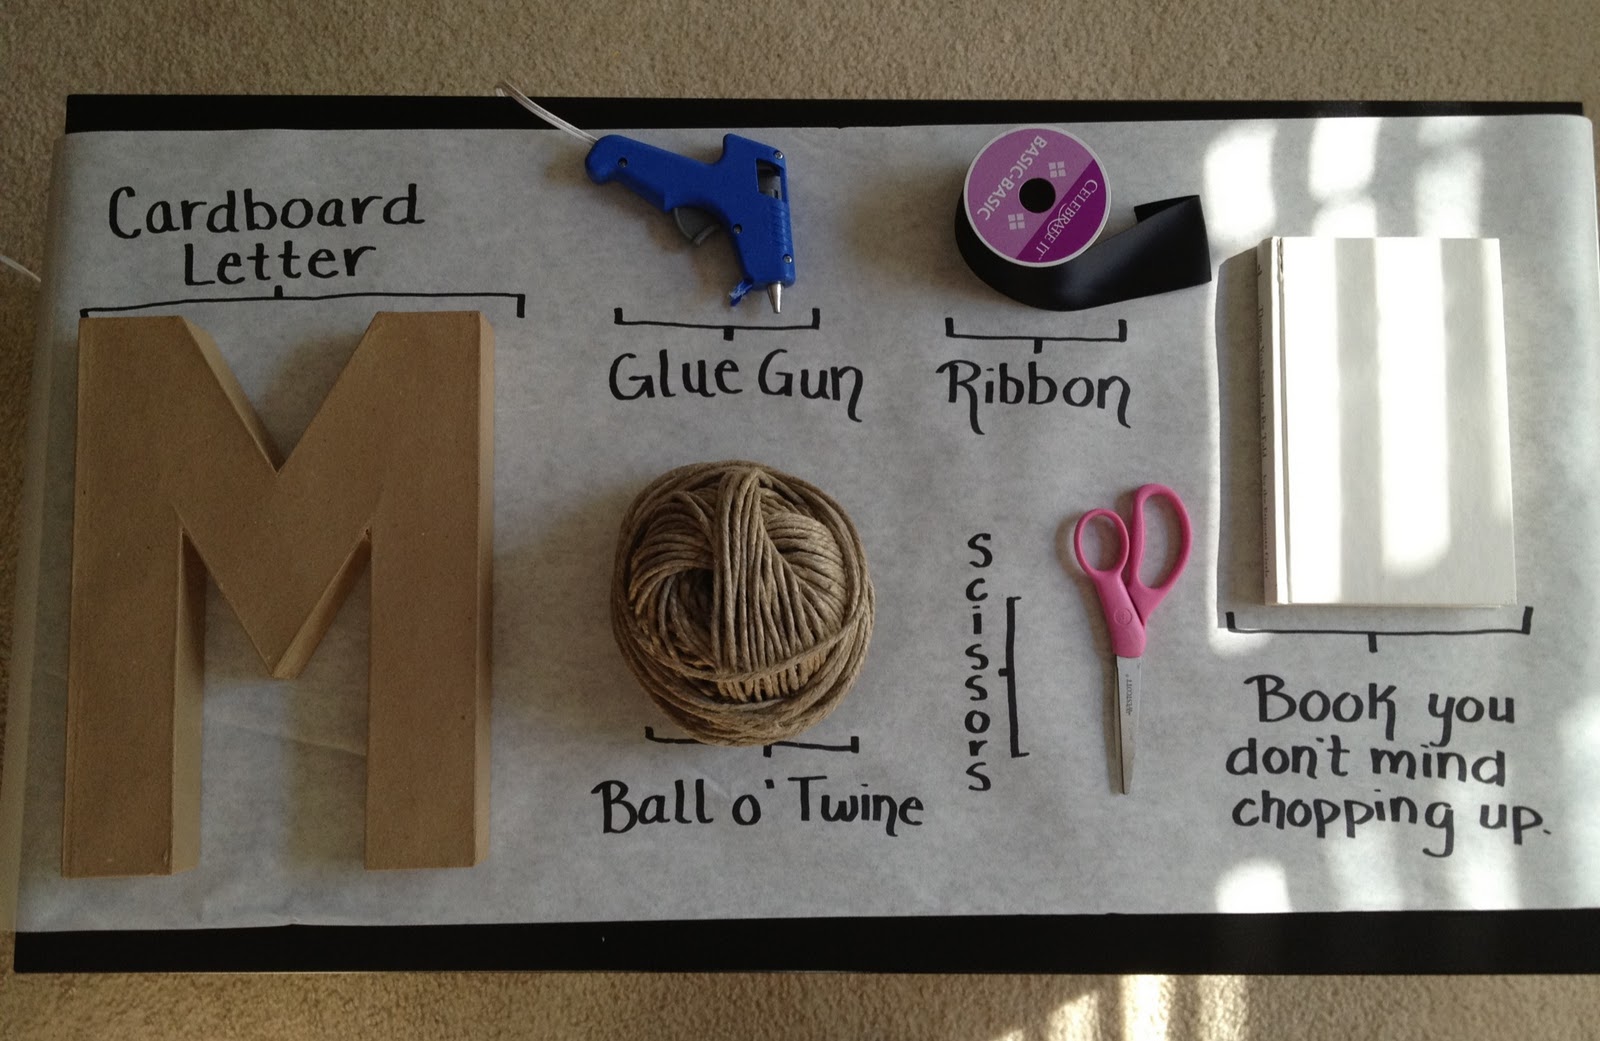
To begin, items you will need....


Step 1: Begin by creating a small line of glue, attach your twine at the bottom of your cardboard letter.


Step 2: With a kung fu grip, start wrapping twine around the letter. The great news--the initial line of glued twine will build your foundation, in other words...no need for further gluing until you reach your stopping point.


Step 3: Continue to wrap. Glue twine to letter until you come to a point where you will have to start on a different section. With this project, I wanted to keep the twine in straight and clean lines. Upon further dissection after I completed the project, it may have been best to just go with the flow of the letter rather than focusing on the horizontal lines.


Step 4: Addition of flair! Create a bow.


Step 4.5: Attach said bow.


Step 5: Addition of EVEN more flair, paper rosettes! Using an old book, slice 3 pages out (side note: The Gals hit up estate sales and used book sales at our local libraries all the time. Old book pages can be used for SO many things!)

With a pencil, create a spiral pattern. No need for perfection here, your pattern can be different sizes and widths. It will give each rosette a varied look.


Cut out spiral pattern. This is what your final outcome should look like...


Step 6: Taking the center of your spiral, begin twisting the old book page. Once you get started, the paper will just start to twist on it's own and you will see the rosette forming.


Step 7: With a glue gun, attach paper rosettes to letter. I wanted to make sure that each rosette was different from the other. So I adopted a "Let Go and Let God" philosophy at this point. I kept one rosette very tightly wound and with the other two released my grip and just let the paper do it's own thing.


Step 8: Using the same ribbon from the original bow--chop approximately 30 inches. Find middle section, tie a bow, and glue the "tails" to your twine wrapped letter.


Final step: Hang and enjoy!


For anyone who loves a monogram or a wreath that is different from your typical holiday door hanging...this is the perfect project. May I add, the repeated wrapping of twine was very cathartic--and it only took me about an hour and half to create!

Total cost of  "Your Not-So-Typical" Wreath: $15
Very similar wreath seen on popular purchase handmade items website: $35 + shipping

The crafting did increase my jolly meter, a bit. Still a bit torn about putting up a tree. I'm thinking of decorating this bad boy, which I saved last Christmas after a neighbor left it for an untimely death at the dumpster. Yes, I trash picked it...but look how it has flourished!


Thoughts on hanging a few small ornaments on "Polly the Poinsettia?"